目次
How to setup f(x)wallet for NeeToken
~Neetokenの為のf(x)Walletセットアップ~
NeeTokenとは言っても、EVM対応する全てのアセット共通の方法です。
また、EVMをサポートするネットワークのアセットであれば、ウォレット一つで対応できるので、管理が一元化され厳密に管理するのも一つなので楽になります。
[en] NeeToken is a common method for all EVM-compliant assets. Also, if the asset is from a network that supports EVM, it can be handled by a 1 wallet, making management easier since it is centralized and strictly controlled by a 1 wallet.
f(x)Walletは、マルチブロックチェーン対応のスマートフォンウォレットアプリです。EVMだけでなく、BTCやTronなど様々対応し、Metamaskと完全互換で、アセット共有可能になっていて便利です。単独で使うのも良いですが、Metamaskと共有したアカウントの場合、スマホから操作できるので便利です。
[en] f(x)Wallet is a multi-blockchain smartphone wallet app that supports not only EVM, but also BTC, Tron, and many others, and is fully compatible with Metamask, making it convenient for asset sharing with a smartphone. It is good to use it alone, but in case of an account shared with Metamask, so it is convenient to operate it from your smartphone.
セットアップ動画もあります。(参考)
新規セットアップ(ゼロからセットアップ)
解説動画:https://www.youtube.com/watch?v=wnIFgnJwLFI
既にMetamaskを持っているが、共有で使いたい
解説動画:https://www.youtube.com/watch?v=znepn7eDUSA
簡易セットアップガイド Simple setup guide 2023-06.
Step 1
アプリをインストールします。同名の違うアプリに注意してください。ウォレット名は「f(x)Wallet」または「f(x)Wallet by Function X Labs」で、提供は「PUNDI X LABS」になっています。とはいえ、下にリンクします。
[en] Go to install the app. Note the different apps with the same name. App name is “f(x)Wallet” or “f(x)Wallet by Function X Labs”, and provider by “PUNDI X LABS”. Although, below such url link.
For iOS :
https://apps.apple.com/us/app/f-x-wallet-by-pundi-x-labs/id1504798360
For Android:
https://play.google.com/store/apps/details?id=com.pundix.functionx
Step 2
インストール後、アプリを起動してセットアップを開始します。バージョンや機種環境により、若干の見え方の違いがある場合がございます。
[en] After installation, start the app and begin setup. Please note that there may be slight viewing differences in appearance depending on the version and model environment.
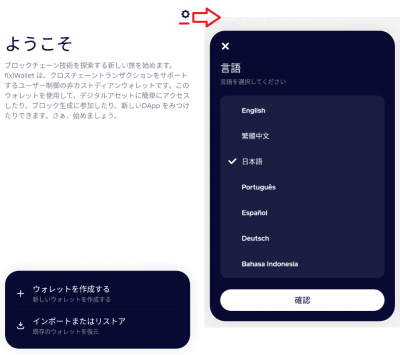
アプリを起動すると、使用環境の言語で表示されますが、異なる場合は、上の歯車マークで言語設定を変更してください。
[en] When you start the app, it will be displayed in the language of your operating environment, but if it is different, please change the language setting using the gear-wheel-mark above.
メニューは2つです。上のメニューはウォレットの新規作成です。下のメニューは既にウォレットを使っている場合選びます。ここでの注意は、既にウォレットを使っているというのはMetamaskとその互換ウォレットも含むことができます。
つまり、Metamaskと共用の便利なウォレットにしたい場合は、「インポートまたはリストア」を選びましょう。そして、Metamaskのニーモニックキーの入力へ進みましょう。
繰り返しますが、Metamaskを使用している場合は「インポートまたはリストア」です。
インポートまたはリストアのガイドへ
[en] There are two menus. The upper menu is for creating a new wallet. The lower menu is for if you are already using a wallet. Note here that already using a wallet can include Metamask and its compatible wallets.
That is, if you want a convenient wallet to share with Metamask, choose “Import or Restore”. Then proceed to enter the Metamask mnemonic key.
Go to guide of import/restore.
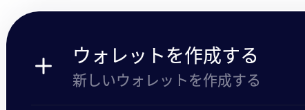
このガイドでは、まっさらな新規ウォレットのセットアップで進めます。「ウォレットを作成する」
[en] In this guide section, we will proceed with a brand new wallet setup. “Create a Wallet.”
Step 3
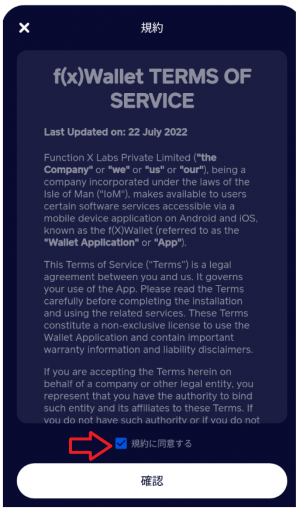
次に規約が出ます。読んだあと、規約に同意にチェックして「確認」です。
[en] Next you will see the Terms of Use. After reading, please check the “I agree to the terms ~” checkbox and proceed.
Step 4
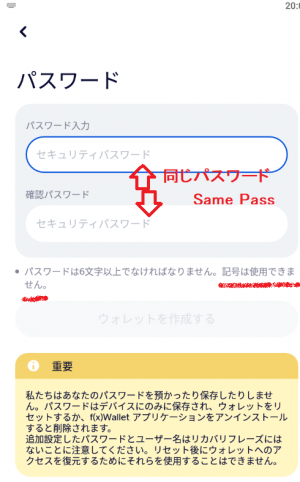
次はセキュリティパスワードの設定です。これはこのアプリを操作する際に求められることがあるパスワードで、アプリ固有のものです。再インストール時や別のスマートフォンに設定する際は改めてそこで固有のパスワードを決めます。
指紋認証も実装されているので、厳密には難しい長いパスワードを考える必要はありません。
The next step is to set the security password. This is the password that you may be asked for when operating this application and is unique to the application. When reinstalling the app or setting it up on a different smartphone, you will again decide on a unique password there.
Note, Fingerprint authentication is also implemented, so there is no need to think through long passwords that are strictly difficult.
入力に問題がなければ、ウォレットを作成するに進めます。
[en] If you are satisfied with your input, proceed to Create Wallet.
Step 5
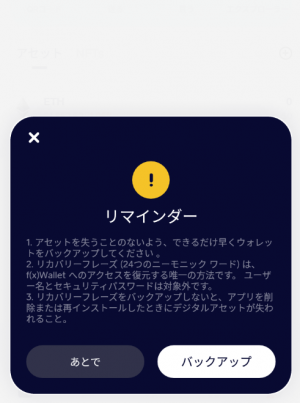
プッシュ通知の受け取りは便利です。そのあとにリマインダーの確認が出ます。今回新規ウォレットですので、確実にバックアップを実施すべきです。
[en] Receiving push notifications is convenient. After that step, you will a reminder configuration. Since this is a new wallet, a backup should certainly be implemented.
右のバックアップに進みます。
[en] Proceed to the backup on the right.
Step 6
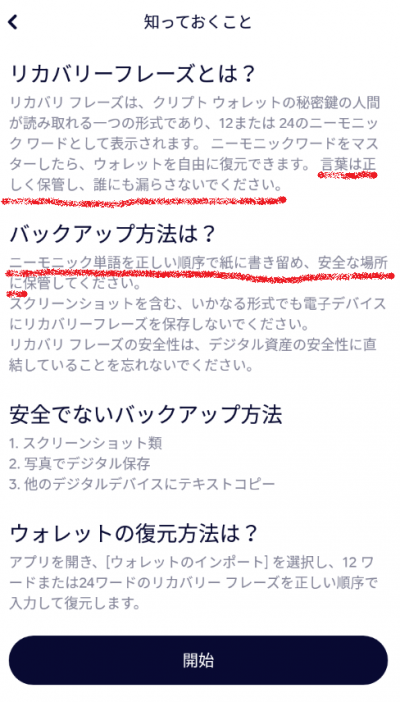
大事な説明です、特に赤線の部分にある秘密鍵であるニーモニックキーは紙で行うという部分は大事です。できれば作成したバックアップの紙を完全コピーし、別の安全な場所にバックアップのバックアップをしましょう。
[en] This is an important explanation, especially the part in red (Maybe same section in English) that the mnemonic key, which is the private key, is done on paper. If possible, make a complete copy of the backup paper you created and back up the backup in another secure location.
開始するとパスワードを聞かれる。STEP4でのパスワードです。
[en] When you start, you will be asked for your password. Check STEP4.
Step 7
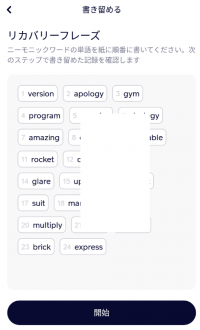
指導に従い、ニーモニックキー(リカバリーフレーズ)を書き留めます。順番と文字が大事です。デジタル保存は良くない方法ですが、その画面を何らかの方法で印刷し、紙にするのは正確なので悪い方法ではありません。但し、印刷のミスケースについてはご注意ください。
[en] Follow the instruction and write down the mnemonic keys(Recovery phrases). The order and the letters are important. Digital storage is not a good method, but printing that screen in some way and putting it on paper is not a bad method because it is accurate. However, please be careful about printing mishaps.
手書きの為のパスフレーズ用の用紙もあります。
There is also a form for passphrases for handwriting.
PDF : recovery_pss.pdf (ダウンロード/Download)
Step 8
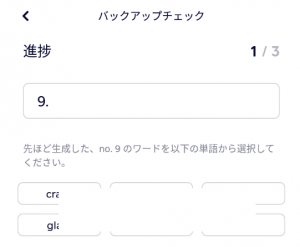
書き留めたものがあってるか確認です。この画面では9番目のワードを聞いています。
[en] This is a confirmation that what you wrote down is correct. In this screen we are listening for the 9th-word.
進捗プロセスは 1/3 つまり3回聞かれます。
[en] The process is 1/3, i.e., asked 3 times.
Step 9
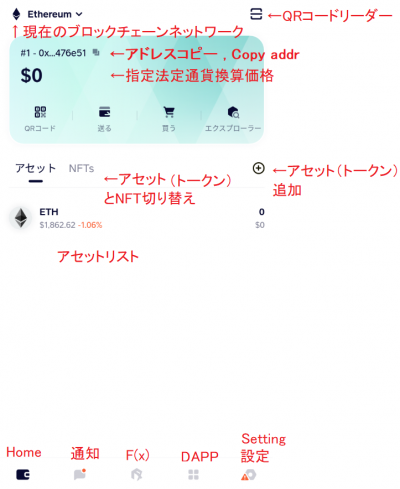
成功すると、ウォレットのホーム画面が開きます。画面の説明は以下画像の通りです。先に「設定」を確認します。
[en] If successful, the Wallet Home screen will open. The screen description is shown in the image below. Check “Settings” first.
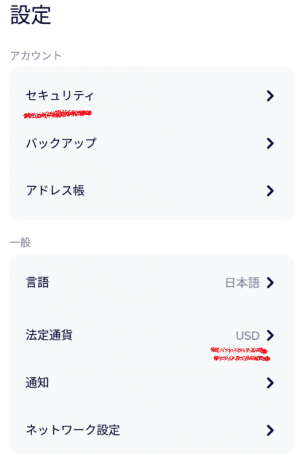
設定は下の方のこれです。 [en] The setting is this one below.
Step 10
重要なのは2つ。機種が対応していて指紋認証を使いたい場合はセキュリティ。それと表示の法定通貨の設定です。
[en] There are two important things. Security if the model is compatible and you want to use fingerprint recognition. And the legal currency setting for the display.
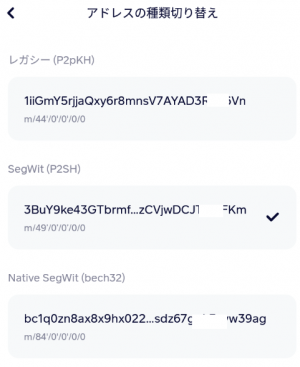
余談で、ウォレットのBTCアドレスの種類の変更などもできます。各種設定はあとで確認すること。
[en] As a side note, you can also change the type of BTC address in the wallet. Check various settings later.
Step 11
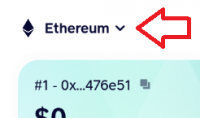
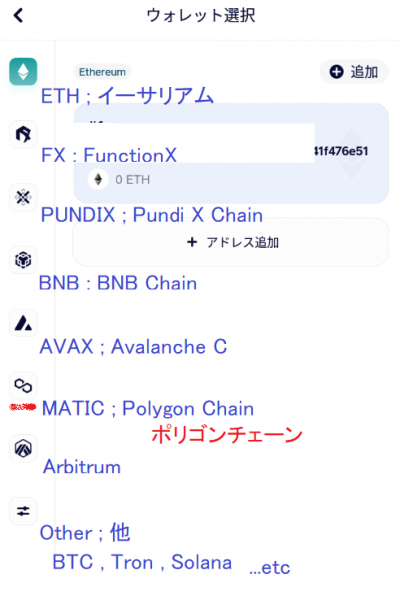
次にブロックチェーンネットワークを切り替えます。これはいつでも自由にできます。STEP 9の画像の一番上です。
[en] Next, switch the blockchain network. You are free to do this at any time; it is at the top of the image in STEP 9.
赤字のポリゴンチェーンに切り替えます。選んだら、横のアドレスの部分を選びます。つまり、チェーンを選んでアドレス選んでの順です。
[en] Switch to the polygon chain in red. Once you have made your selection, select the address section next to it. In other words, select the chain, select the address, and so on.
Step 12
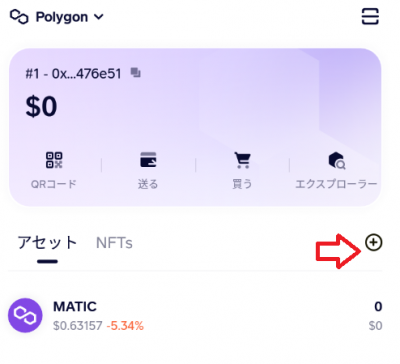
無事ポリゴンチェーンに切り替わったら、NTT(NeeToken)を追加します。画面のトークン(アセット)追加を選びます。
[en] Once you have successfully switched to the polygon chain, add NTT (NeeToken). Select Add Token (Asset) on the screen.
Step 13
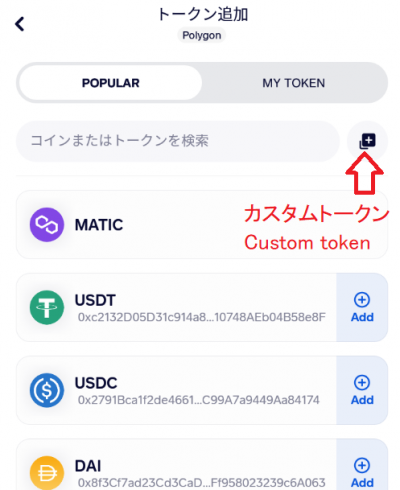
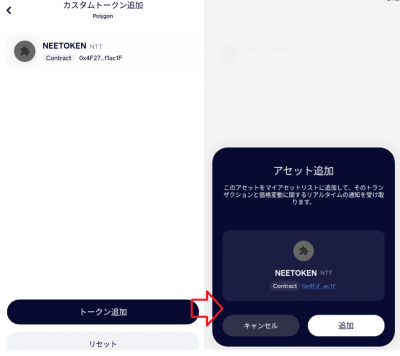
メジャーなアセットであれば、すぐに選んで追加できますが、そうでないものは検索または手動で追加します。検索は曖昧な時に便利ですが、確実なのは手動です。手動はカスタムトークンの追加になります。
[en] If it is a major asset, you can quickly select it and add it; otherwise, search or manually add it. Search is useful when there is ambiguity, but manual is more reliable. Manual is the addition of a custom token.
Step 14
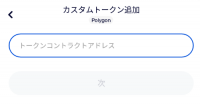
トークンのコントラクトアドレスを入力(コピ&ペースト)します。
[en] Enter (copy and paste) the contract address of the token.
NeeToken NTT : 0x4F274A7da3F8A6019C00A32E929D5F2886f1ac1F
Step 15
Step 16
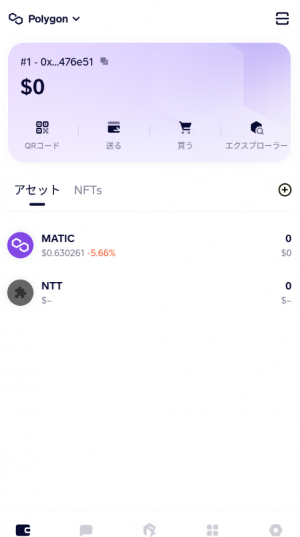
ホーム画面に戻ると、成功していればアセットリストに表示されています。各アセットを選択するとそのアセットを操作できます。
[en] When you return to the home screen, if you were successful, you will see it in the asset list. Then selecting each asset allows you to manipulate it.
Step 17
さいごに、ご自身のアドレスをどうやって扱うか説明します。アドレスは長いのでコピーアンドペーストかQRコードを利用するのが基本です。ご自身のアドレスのコピーは以下の画面のところです。他でも出来る部分はあります。
[en] Finally, we explain how to handle your own address. The address is long, so copy-and-paste or use a QR code. A copy of your address is at the following screen. There are other areas where you can do this as well.
コピーが出来ると成功は表示されます。ペーストして使用時は念のため末尾数文字の目視確認をするのが基本です。
[en] Success is indicated when copying is done. When pasting and using, it is fundamental to visually check the last few characters just to be sure.
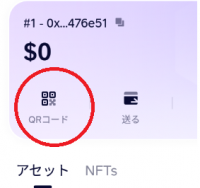
QRコードはこちらです。
[en] Here for the QR code.
Step 18
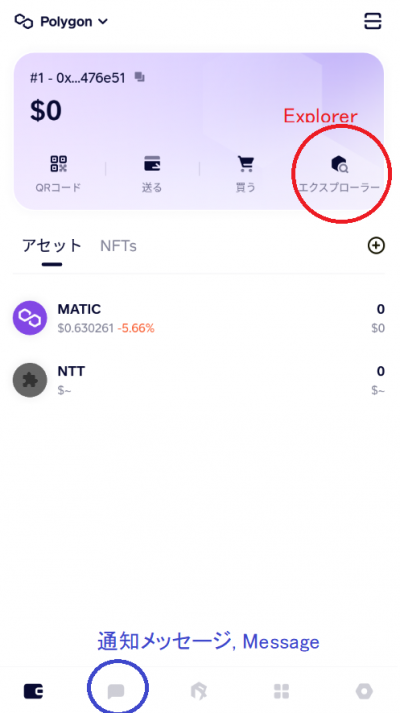
履歴の確認がしたい場合は、直近であれば「通知」でも分かるかもしれませんが、詳細で厳密な履歴はエクスプローラーになります。見るのに慣れが要りますので、慣れないうちは通知のメッセージリストでも良いかもしれません。
[en] If you want to check the history, you may find it in “Notifications/ Message” for the most recent, but the detailed and exact history is in the Explorer. It takes some getting used to seeing it, so if you are not used to it, you may as well use the message list in Notifications.

